mIRC Settings UPP Settings Shared Folders Queues and Queuepools Triggers Fserve Ads Sends @find and Priority
First, you need to pick a fserve script. I highly recommend UPP (mIRC), and most of this guide is dedicated to setting up that particular script. UPP is a single download of mIRC with all of the scripts already included, so use that to install a new mIRC rather than trying to update a current mIRC installation. Set up this new mIRC however you want, with your nick and whatever else.
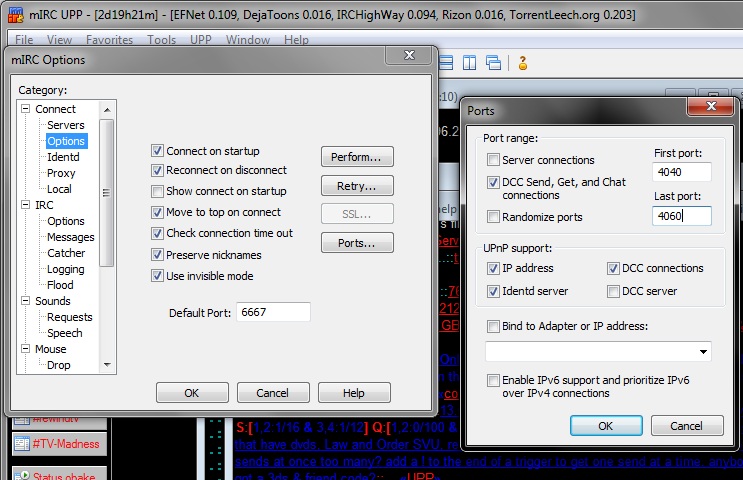
Next you need to set up your network to send files. If you have a single computer hooked directly into a modem/cablemodem/dsl-box, then you don't really have to do anything. If you are behind a router or switch (allows multiple computers to share an internet connection), then you must forward the DCC ports. Follow this link for help on how to do this: http://www.portforward.com/english/routers/port_forwarding/routerindex.htm Just select the model router you have (or one close if you can't find yours) and then choose "mIRC DCC - IRC DCC". You need to set a port range for the sends to use, I prefer ports between 4000 and 5000, and you only need about 5 ports, but to be safe you should use 4040 through 4060.
Now that you have set up your network to allow file sending, we can start setting up mirc for it. You need to go into the mirc options, by clicking on the second icon from the left under the menu bar (the little folder with the hammer) or by going to the View menu and selecting "Options...". A new window will pop up with a whole bunch of category tabs on the left. Clicking on a + symbol will add a whole bunch of subtabs underneath it, and clicking the - removes them.
Under the 'Connect' + symbol go to the 'Options' tab (note that there are two subtabs labeled 'Options'). Click on the "Ports..." button (older versions of mIRC label it "Advanced...") to open another little window. Here you should make sure the boxes are checked for "DCC" "Other" and "Use random ports". First and Last is the port range that you set in your router (First: 4040 Last: 4060).
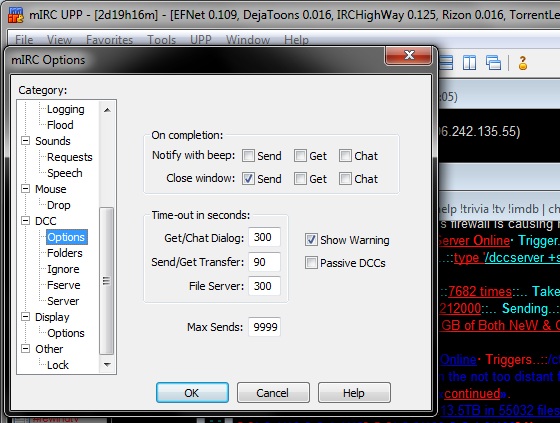
Next, under the 'DCC' + symbol go to the 'Options' tab there. You should really change the "On completion:" section so that the Send box for Notify with beep is unchecked, but the Send box for Close Window is checked. The Get and Chat boxes don't matter for a fileserver, so you can set them to whatever you want. Then in the "Time-out in seconds:" area set the "Get/Chat Dialog:" to 90, "Send/Get Transfer:" to 60, and "Fileserver:" to 90.
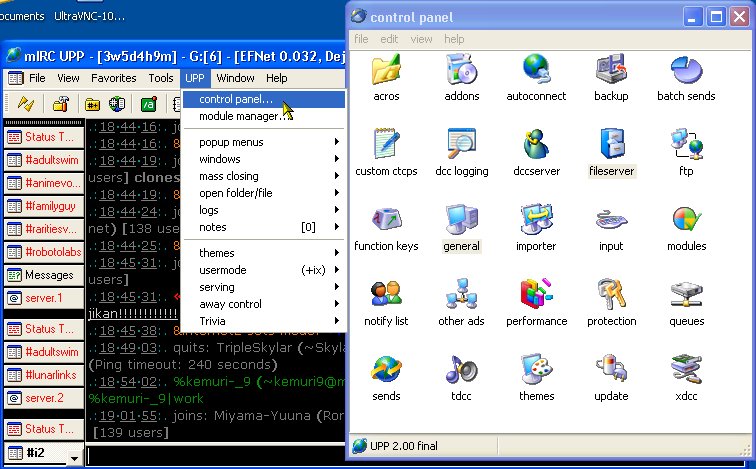
Now click on the UPP pulldown menu, and select "Control Panel" This will bring up a new window with a whole bunch of sections (called modules). This is where you can change all of the settings for the UPP script.
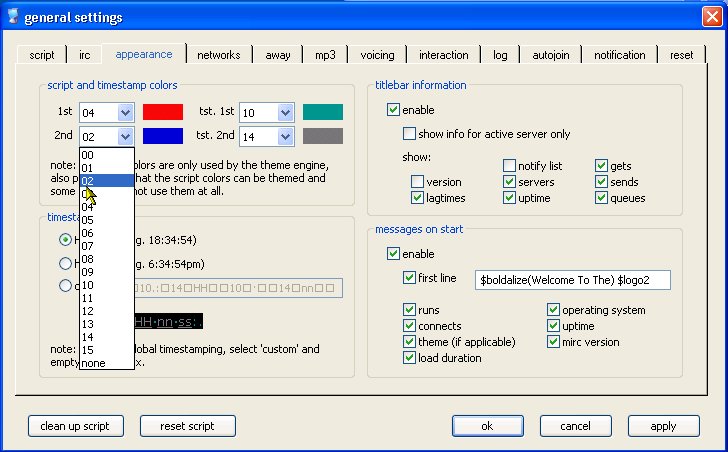
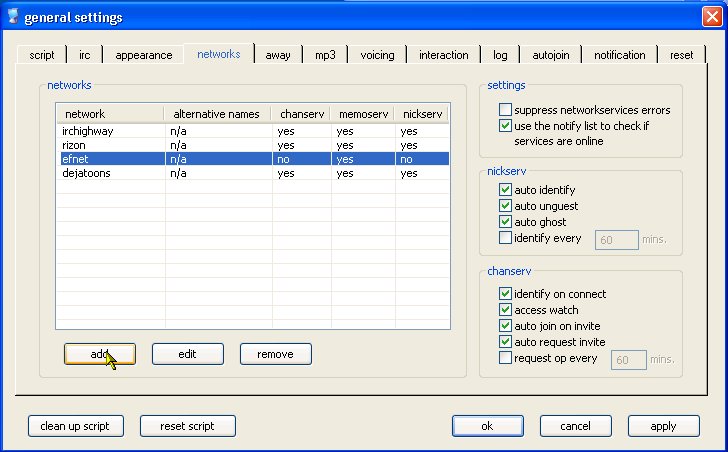
First double-click on the one marked "general". Go to the the "appearance" tab, and select the two colors you want your ad to use ("1st" and "2nd"). Under the "networks" tab, you can set up services (like identifying your nick) for each network you connect to, but you can skip this for EFNet. You can look around at the other options, but this is all you need for a fserve.
Next, double-click on the "fileserver" icon. This is where we set up all of the options for the fserve. First we must set up queuepools, then mountpoints, then triggers, then ads. Go to the "general" tab first, and enable "enable fserve on start".
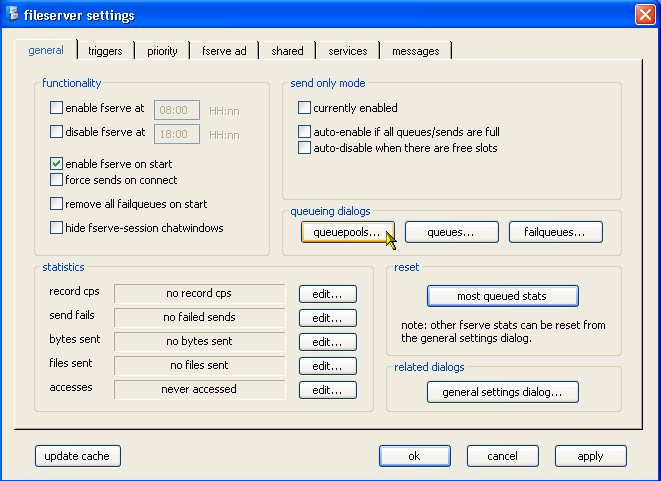
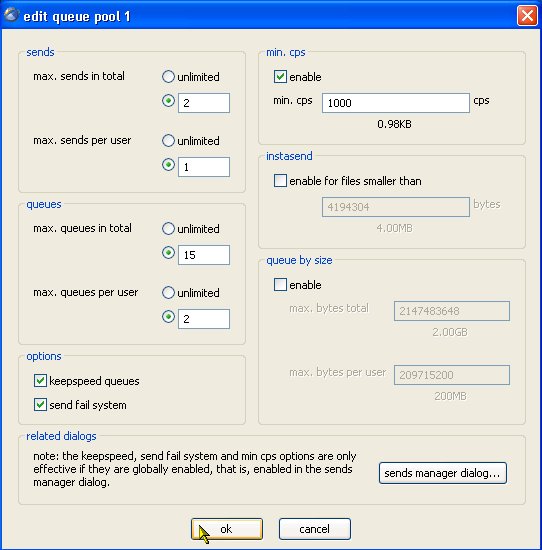
Also on the "general" tab, click on the "queuepools..." button. This will bring up a window with a list of pools. Each of these pools is a separate line of files waiting to be sent. Usually you only use one pool, but you can set up more than one if you want. Click on a pool, and then click "edit". "Max sends total" is how many sends you want to occur at the same time. "Max sends per user" is how many sends you will allow each downloader to have at the same time. "Max queues in total" is how many files you will allow to wait in line for a send. "Max queues per user" is how many files each downloader will be allowed to put in line. Usually I would allow one or two sends total, one per user, 15 queues total, 2 queues per user. "Min cps" is the minimum speed a send has to go before it is stopped, usually this is enabled and set to 1000 (about 1 k/s). Instasend will send files smaller than a certain size automatically instead of putting them in the queue. You can also select to queue by total size, like allowing a person to queue up to 500mb worth of files at once instead of 2 files.

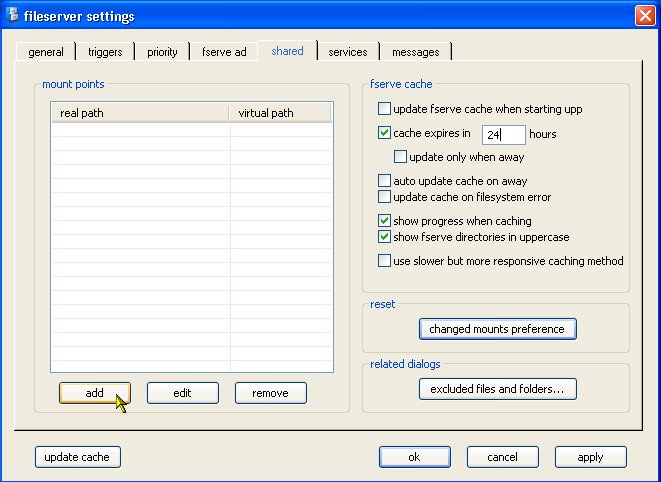
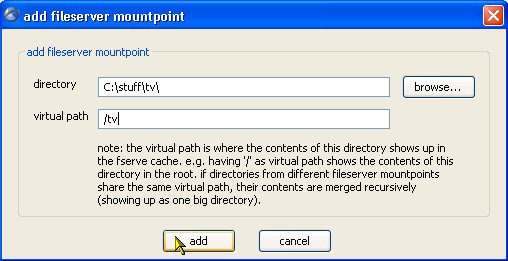
Once you have your queuepool(s) set up, go back to the fileserver settings window and click on the "shared" tab. Click on the "add" button, and browse for a folder you want to have shared. All of the folders inside that one will be added as well. Then you can type in a "virtual path" which can be anything you want, like if the folder has a bunch of tv shows, just use "/tv". Add however many mount points you want, and then look at the fserve cache options. UPP makes a list of files in the shared folders in what's called a cache. When you add or delete files in the folders, it won't make the change in the fserve until the cache is updated (deleted files will show up in the fserve file list, but can not be downloaded by anybody). You should set the cache to expire every 24 hours, although you can set it to less. This will update the cache on a regular schedule, letting you ignore it. Click on the "apply" button in the "shared" tab when you are done with this, and click "yes" to update the cache.
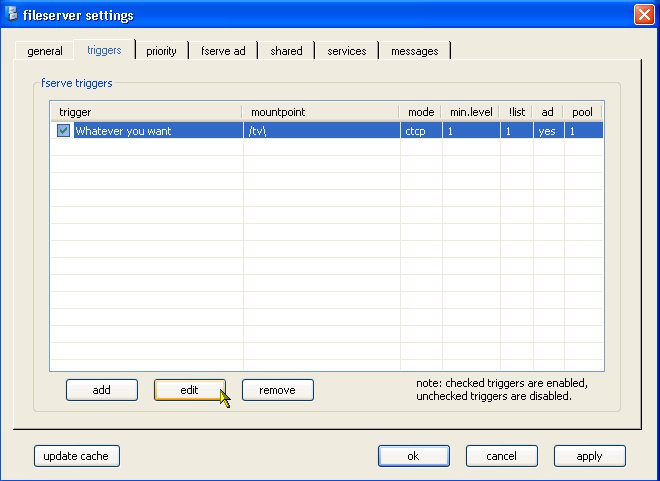
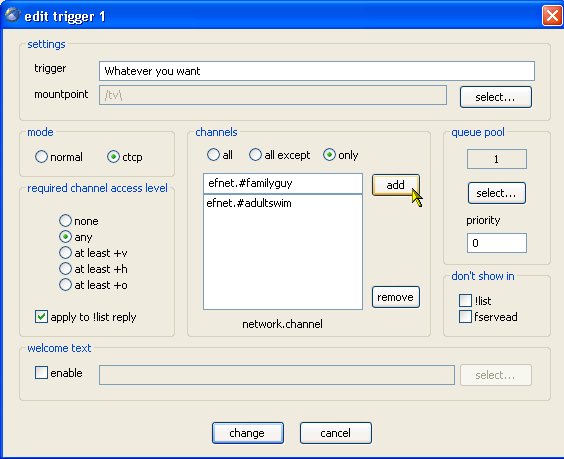
Next, click on the "triggers" tab. Click "add" to set up a new trigger. You can write whatever you want to be the trigger, it's what the downloader must say to open up your fserve. You need to select a mountpoint (the virtual path you set up in the shared tab) for the trigger to lead to. Mode should be set to "ctcp", otherwise your trigger may end up looking like spam in the channel. You can select whether you want this trigger accessed by certain ranks in the channel or by anybody, and you should have "apply to !list reply" checked. Now you should choose which channel the trigger will be active in. "all" is fine if you will only be in the channels you want to serve in, but you should really choose "only". Then you can type in a network and channel (for example "irchighway.#mst3k") and click "add". The list of channels will be shown below. Last you need to select a queue pool for the trigger to put files in. Now you can click on the "add" button at the bottom of the window, and there will be your trigger.
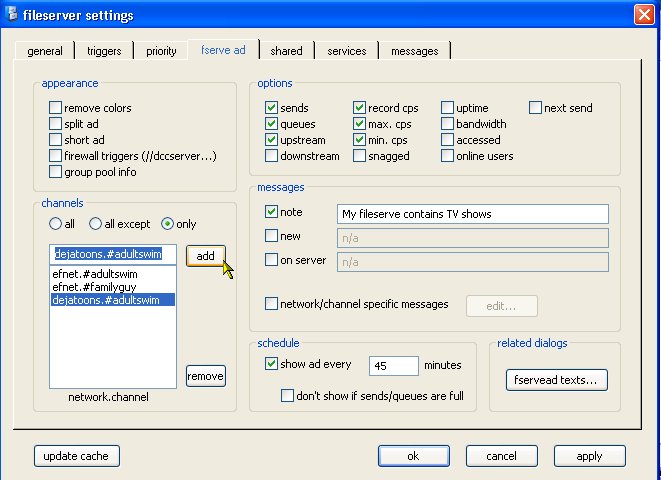
Finally, you will need to go to the "fserve ad" tab. Everything in the appearance section can remain unchecked. In the channels section, you can choose only to show the ad in certain channels, making it a secret fserve in others. The options section lets you select which stats show up in the ad. Usually "sends" "queues" "upstream" and "record cps" are selected. In the messages section, you can add messages to your fserve ad. All you need to do is check the box for the one you want, and type in what you want it to say. You can set up custom messages for each channel as well, if you want. Last, you should check "show ad every" and type in the number of minutes. This should be set to at least 30, so the ad appears every half hour.
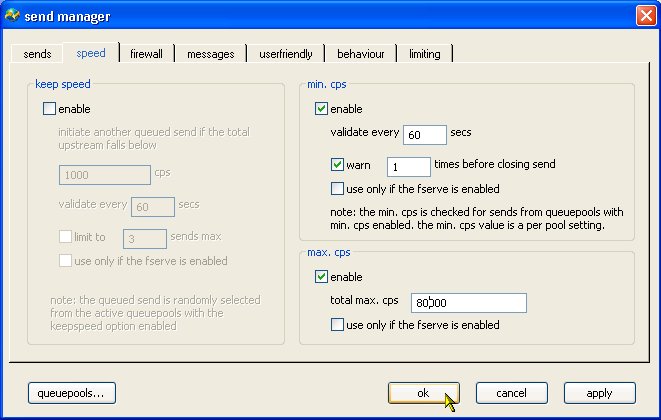
Now you can close the fileserver settings window, and go on to the last step. Open up the "sends" settings in the control panel. Go to the "speed" tab. "Max cps" is the important one here. This limits the maximum speed of all sends, and this should be set to a little bit below your total speed AT MOST. 1000 cps is about equal to 1 k/s. "Min cps" should be enabled so that it will enforce the speed you set in the queuepools. "Keep speed" will check the speed of all sends, and if they are below a certain speed it will send another file even though it goes past the maximum number of sends. Supposing you want to use this, it shouldn't be much more than half of your max cps, but most people keep this disabled.
Now your fserve should be completely operational. Have somebody else test out !list in the channel to make sure your ad shows up. Have them also test out your trigger to make sure that works, and they should test downloading a file as well (they can cancel the get once it starts sending).
OPTIONAL:
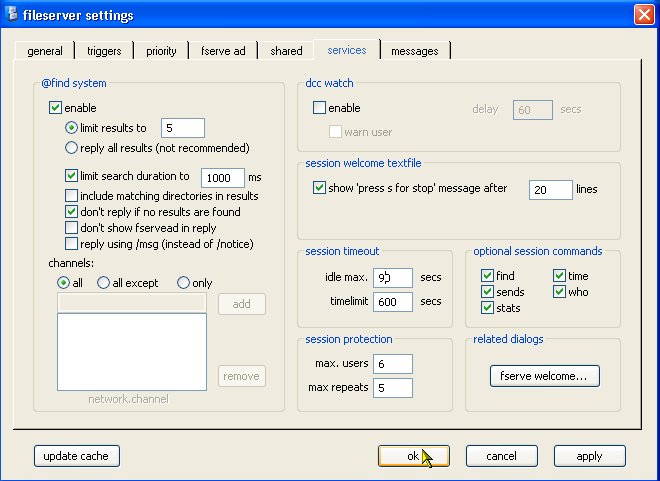
There are a few other options you can set up in the "services" tab, like enabling the @find search function, and setting the maximum number of users that can have a fserve window open at once. You can also set up the fserve window timeout here.
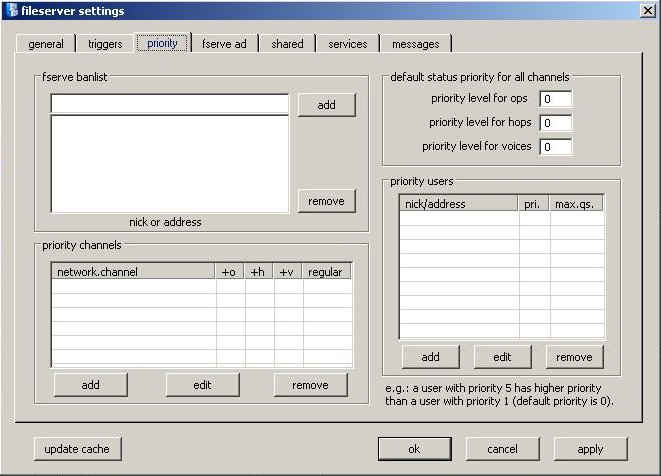
You can also go to the "priority" tab and set up people in certain channels to have priority, or certain people or ranks. You can also ban people from using your fserve here.