Level 4: Jungle Labyrinth
Tile: 1A. Order: Past, Future, Present
Items: Ladder, Master Sword (L1), Bombs+
Level 4-1: Past
Item: Ladder
Boss: Gleeok (4 heads)
This dungeon is in all three time periods. In the map below, left is LVL 4-1 Past, middle is LVL 4-2 Future, right is LVL 4-3 Present. Passageways move between time periods and stay in the same location.
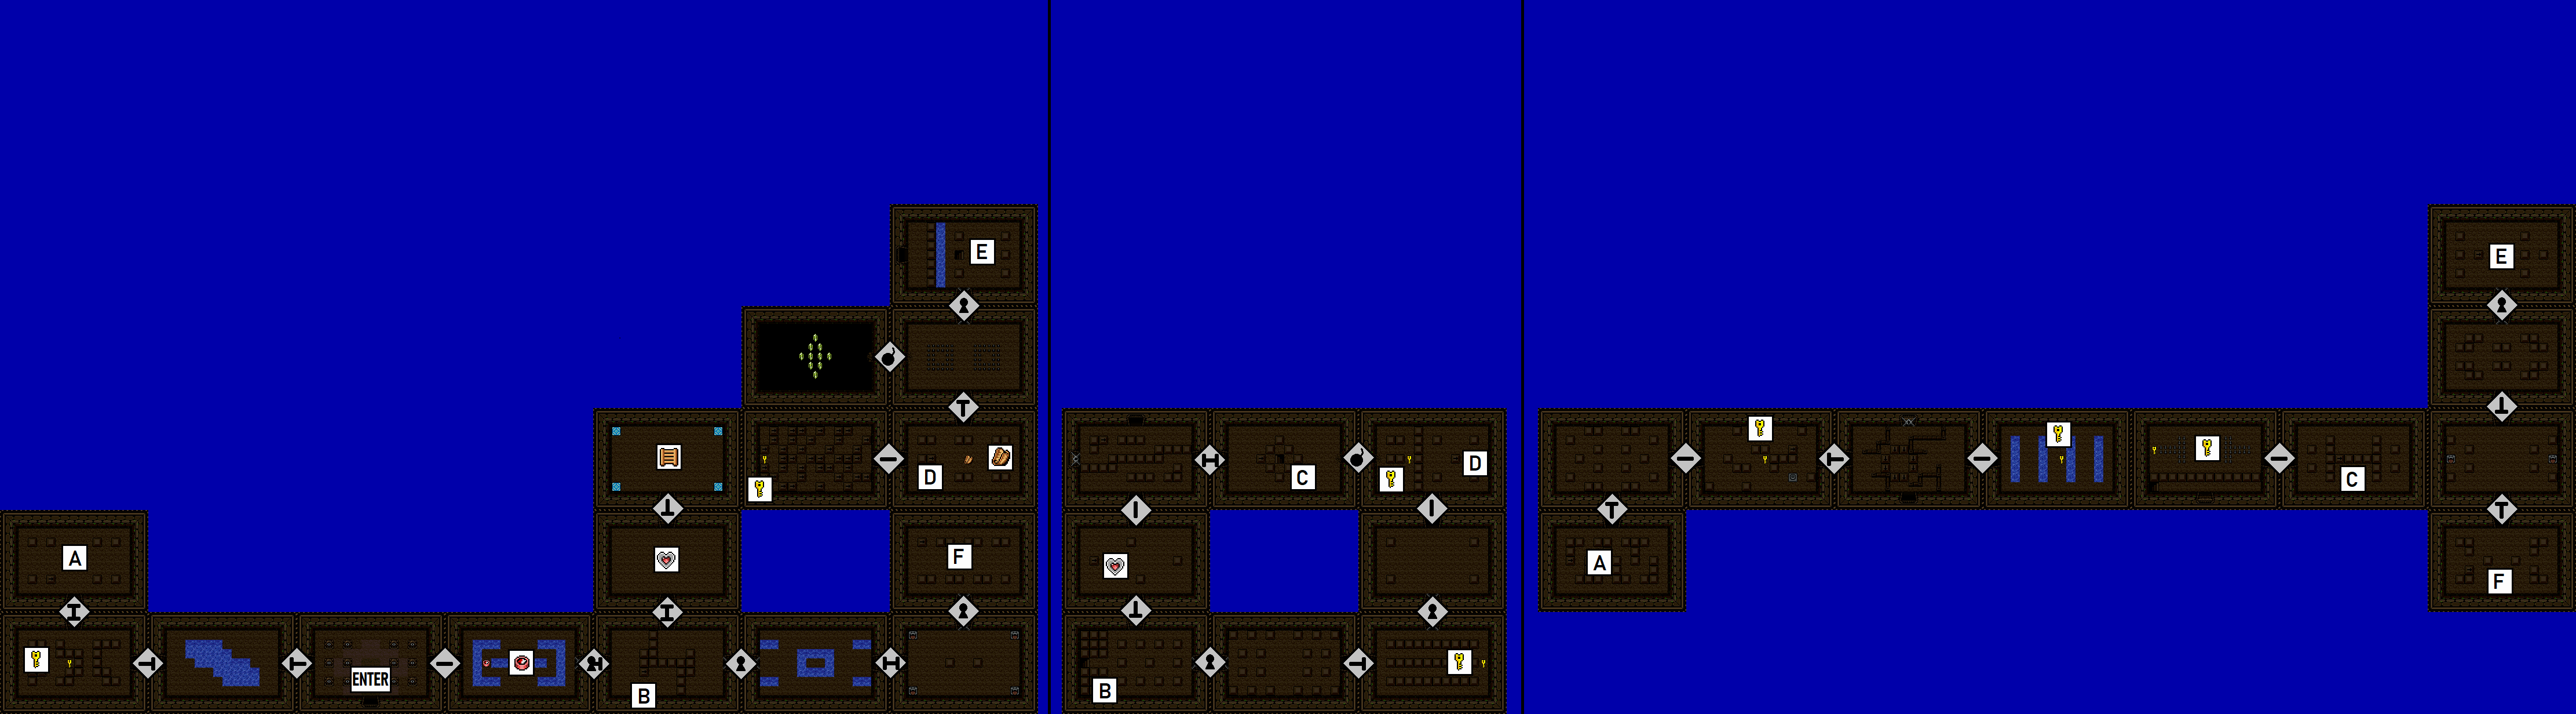
Start by going west. You'll find a key in the corner room, but then also passageway A north of it. Go through passageway A.
Passageway A brings you to two keys. When you see the block room that has four doors, it's not really a branch. Go back to the start (A and south east).
Go east from the start. The compass is in the next room, and passageway B is in the room after that. Go through passageway B.
Go north one and find a heart container piece under a block. Keep following the path, but it's not a dead end. Bomb a wall to get a key, then go through passageway C.
Passageway C just leads to a key, so get it and go back through passageway C. You need to circle around to the other side of the room you bombed into.
West and south and east, and get a key, then north. You would have noticed the bombable wall now. Go into passageway D.
Get the map. Go west to get a key and then back east. Then go north and into passage way E.
From E to the boss, there are no branches. Go south a few times and into passsageway F. From F loop around to the boss room.
Collect the boss's heart container piece, and go north to collect the ladder. Exit the dungeon.
Level 4-2: Future
Item: Master Sword
Boss: Digdogger (3 kids), Bubbles
This dungeon is in all three time periods. In the map below, left is LVL 4-1 Past, middle is LVL 4-2 Future, right is LVL 4-3 Present. Passageways move between time periods and stay in the same location.
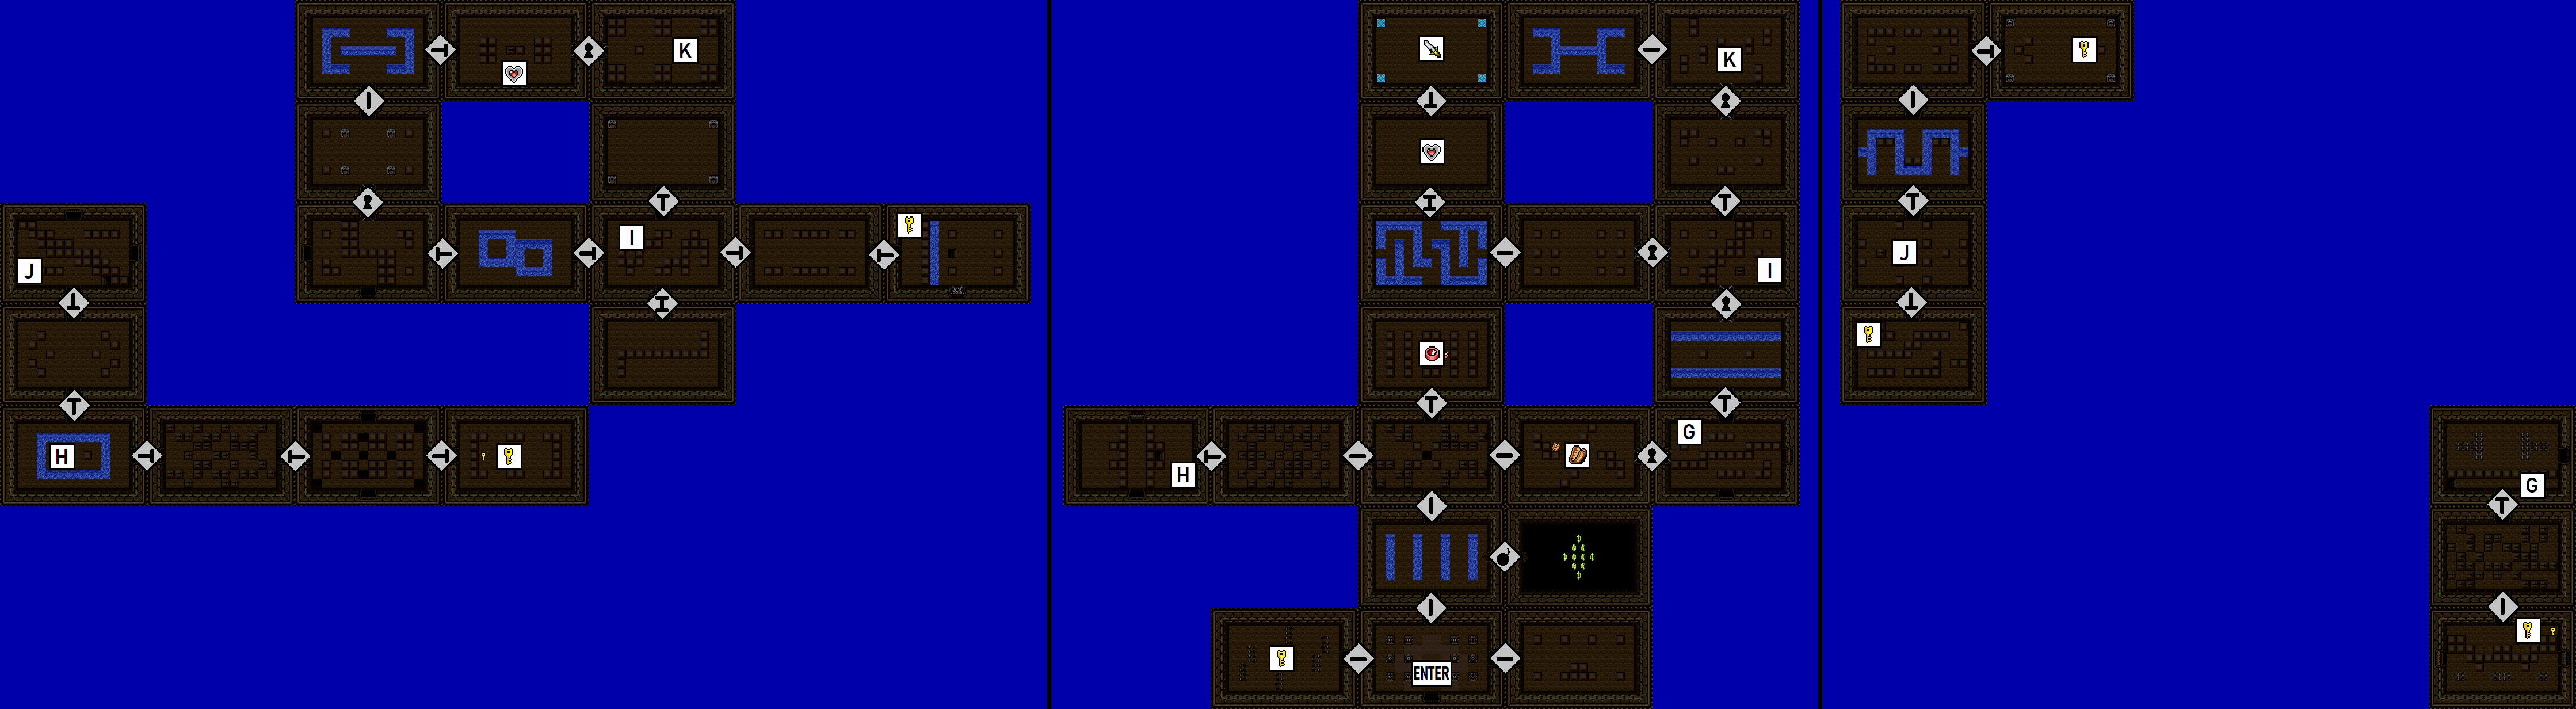
Go west and get the key, then back east to the start, and then north a couple times until a dead end with the compass, and then go back south one room.
This room sort of looks like it's not a branch, but it does branch. First, go west a couple times and into passageway H.
There are two branches. Go east a few times to get a key, come back, and go north a couple times and into passageway J.
First go south once and grab a key. Then go north several times and when the path turns east there's a key at the dead end.
(faster to end+continue) Go back through J, then south and through H, and then east into that block room.
Go east and get the map, then east again and into passageway G. From passageway G go south twice and get a key, and then back through G.
Go north twice and into passageway I. Go east twice to get a key, then back west twice. Keep going west and follow that path.
When you get to the second key door in this path, there's a heart container piece hidden under a block. It's the room before K.
Getting to the end of the branch is passageway K, so go in there. Go south and follow that branch all the way to the boss.
Collect the boss's heart container piece, and go north to the Master Sword. Exit the dungeon.
Level 4-3: Present
Item: Tear, Bombs+
Boss: Manhandla L2
This dungeon is in all three time periods. In the map below, left is LVL 4-1 Past, middle is LVL 4-2 Future, right is LVL 4-3 Present. Passageways move between time periods and stay in the same location.
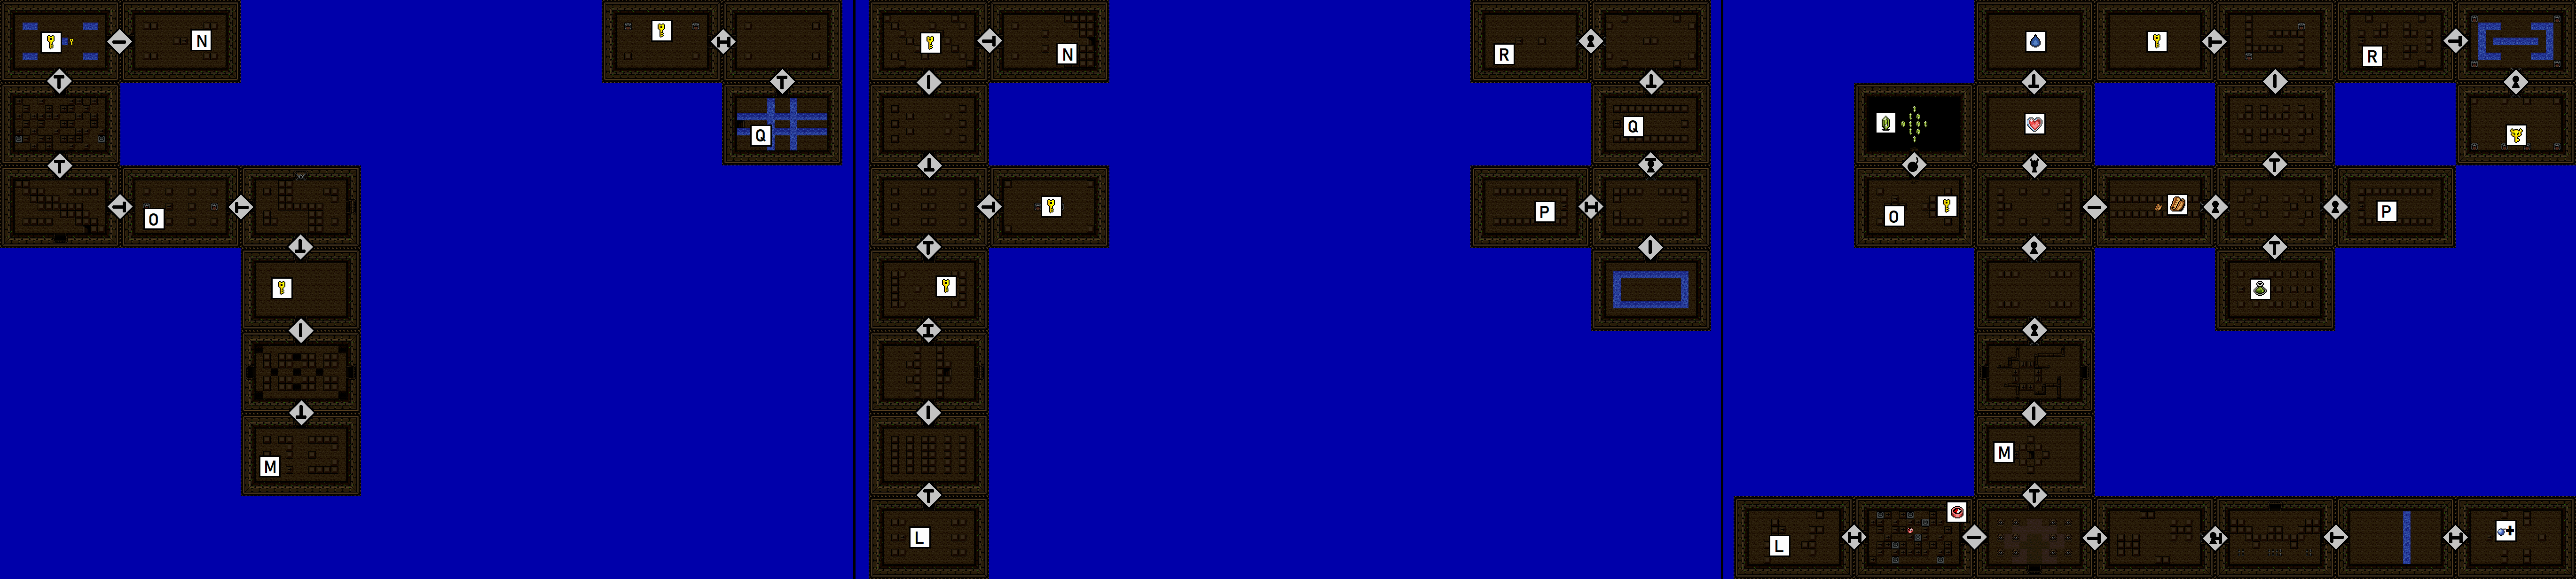
Three ways to go, and west is first, get the compass and further and go into passageway L.
Go north three times to get a key, then north and east to get another key. Then back west and then north twice for another key, and east into passageway N.
Go west and get a key. Go south twice and east once and go into passageway O. Get the key in that room and go back through O.
Continue going down the same path by going east and south, and you'll find a key.
(slightly faster to end+continue) Go south twice and into passageway M. Then go south once and you're at the start.
Go east four times, and at the dead end you'll find a pushable block that will get you more bombs.
(faster to end+continue) Go west four times.
Go north four times and you're at the boss door. Go east and get the map. Then east and south to get the magic container.
Go north a few times, and then west, and you'll get a key. Go back east and south twice, and east and into passageway P.
Go east and then north. Go into passageway Q. North and west to get the last key, then back into passageway Q.
Go north and west, and into passageway R. Go east and then south, and it's the boss key.
(faster to end+continue) Go back through R, and then skip Q and go back through P, and then west three times to get to the boss door.
Collect the boss's heart container, and then go north to get the fourth tear.
Main Page Map Legend Overworld Dungeons Rules Story Items and Enemies PureZC